Android Push Messaging Services
Overview
An important component of the Paytronix Messaging Platform is the ability to send push messages to the guest’s mobile phone. This allows our clients to send short, relevant messages to the lock screen of their members’ devices. It is important that integrated mobile apps also include the ability to receive push notifications. In order to allow your mobile app to receive push notifications sent by the Paytronix system, you must follow the following steps:
- Configure your app to register with FCM (Firebase Cloud Messaging)
- Add code to your application to get the push identifier (registration token) for a device
- When the user signs up and/or opts into push with Paytronix, send the push identifier to Paytronix as an external account
- Add handling to receive push messages to your application
To accomplish steps 1, 2 and 4 above you will need to consult Google’s FCM Documentation. After finishing steps 1 and 2, you will need to send Paytronix an FCM Service Account Key (a JSON file) and app package name. You will need to create and send two keys: one for the development environment, and one for the production environment once your app is certified.
Unlike the iOS ecosystem, you must implement step 4 yourself - the Android operating system will simply hand the push message off to your app.
Authentication
This flow supports the following authentication types: B2B, OAuth, Anonymous. Depending on the authentication type, more fields may be required. See this page for details: API Authentication Styles
Flow
For guests registering through the app
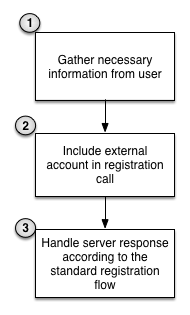
- Gathered the necessary information to register the guest (This flow is documented at this link)
- Send the external account in the call to register the guest. The external account should follow this format: Format of External Account Object
- Handle the server response as you normally would when registering guests
For guests logging into the app
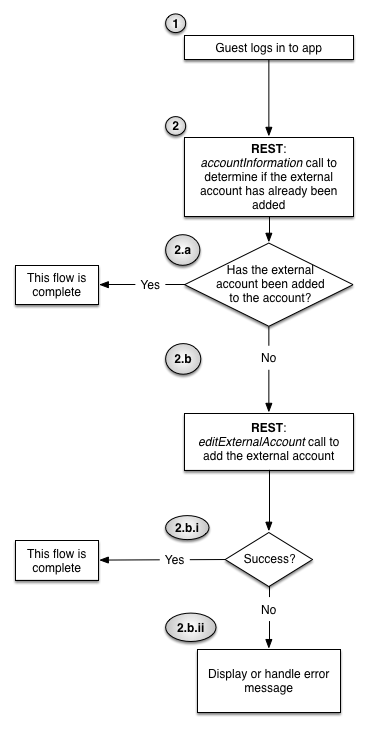
The guest logs into the app (This flow is documented here)
Integration sends accountInformation call to check whether the external account has already been set
If the external account has already been set, take no further action
If the external account hasn’t been set, then send an editExternalAccount call to Paytronix with the external account formatted according to this specification: Format of External Account Object. The Paytronix server will return either a failure or success message.
i. If the server response is success, then the flow is complete
ii. If the server response is a failure, then it is up to the merchant on how to handle the situation. We suggest that the integration uses the error code and error message returned by the system to determine the next action.
Format of External Account Object
See SetExternalAccount for the full definition of an external account. When formatting an external account, please include the following fields:
accountCode- This is the registration token provided by the FCM service.
integration- This is the client_id you were provided when you registered your integration with Paytronix. It should be specific to your Android application; if you implement both an iOS and Android application they should have different integration identifiers.
integrationDetail- This is information about the device on which the app is running. This should include information on the phone model as well as the version of Android it runs.
appIdentifier- This should be a unique identifier to the Android app. If there is an equivalent iOS app these identifiers need to be different. We recommend using the package name of your app.
Example
createAndRegister
This is an example for guests registering through the app
Request Body
{
  "authentication": "anonymous",
  "merchantId": 777777,
  "cardTemplateCode": 0,
  "enforceUniqueFields": [
        "mobilePhone"
  ],
  "setUserFields": {
        "style": "typed",
        "username": [
          "john.doe"
        ],
        "password": [
          "open123"
        ],
        "mobilePhone": [
          "7894563210"
        ]
  },
  "setAccountFields": {
        "style": "typed",
        "favoriteStore": [
          {
                "code": "123"
          }
        ],
        "externalAccounts": [
          {
                "appIdentifier": "com.examplecompany.client.android.app",
                "accountCode": "APA91bGApretendthisisarealvalueitshouldbemuchlongerdt_7bI",
                "integrationDetail": "os=Android|osversion=14.4.2|device=superawesomephone|merchantId=777777|integrator=examplecompany|version=REST:24.1",
                "integration": "3FTmkQuXBnotarealcklientIDFCO9PREEnj_WHaK"
          }
        ]
  }
}
Response
{
  "result": "cardCreatedSuccess",
  "generatedRegistrationCode": "123456",
  "oauthTokens": {
        "access_token": "rIe7dgL5pthisisnotarealtokenqrFbA268pw5GP",
        "expires_in": 1800,
        "printedCardNumber": "9990000003239",
        "refresh_token": "PvOuthisisnotarealrefreshtokenN45TV4kGq",
        "scope": "account_read account_write user_read user_write",
        "token_type": "bearer",
        "username": "john.doe"
  },
  "printedCardNumber": "9990000012345"
}
editExternalAccounts
This is an example for guests logging into the app.
Request
{
  "operation": "add",
  "externalAccounts": [
        {
          "appIdentifier": "com.examplecompany.client.android.app",
          "accountCode": "APA91bGApretendthisisarealvalueitshouldbemuchlongerdt_7bI",
          "integrationDetail": "os=Android|osversion=14.4.2|device=super awesome phone|merchantId=777777|integrator=examplecompany|version=REST:24.1",
          "integration": "3FTmkQuXBnotarealcklientIDFCO9PREEnj_WHaK"
        }
  ],
  "merchantId": 777777,
  "access_token": "rIe7dgL5pthisisnotarealtokenqrFbA268pw5GP",
  "authentication": "oauth",
  "printedCardNumber": "600030100041234455"
}
Response
{
  "result": "success"
}
API Reference
Paytronix
Please see the following API reference page for more technical details: Enrollment Service
Push service terms have been defined here: Glossary
Google
See Google’s Documentation for full documentation on Google’s push messaging service.