Check In
Overview
Points and rewards may be accrued or redeemed via a mobile application through a special process called “checkin.” It is important to note that the insertion of rewards into the guest check and accrual of points must still be performed at the POS. Instead, the checkin message allows the guest to alert the POS that they are in the restaurant and wish to use their loyalty card. With that alert in hand, there is no need to swipe the guest’s loyalty card – the checkin process is in essence a way to completely replace the need to ever use a physical card.
After checking in, there are two ways to associate the guest’s account with the POS. First is by prompting the guest to give the server the short code number returned in the Paytronix checkin reply. This short code is a short, typically 3 digit number that may be used at the POS in place of a longer printed card number. The second option is to require no input from the guest at all. Instead, the server will touch a button at the POS and select the correct account from a list of all checked in guests. It is common to offer both of these options at once.
When sending a store-specific checkin message, a single store must be specified. This checkin will then only be valid at that particular location – it will not appear at any other restaurants. In addition, all checkins expire after a set period of time, typically between 60 to 180 minutes. After this time, the checkin alert will no longer appear at the POS and the short code will no longer be valid. The guest must re-check in if they have waited past this window.
Authentication
The checkin endpoint allows for several different types of authentication: OAuth, B2B, and card. For mobile apps, we typically recommend using “OAuth” as it offers the greatest flexibility and security.
Flow

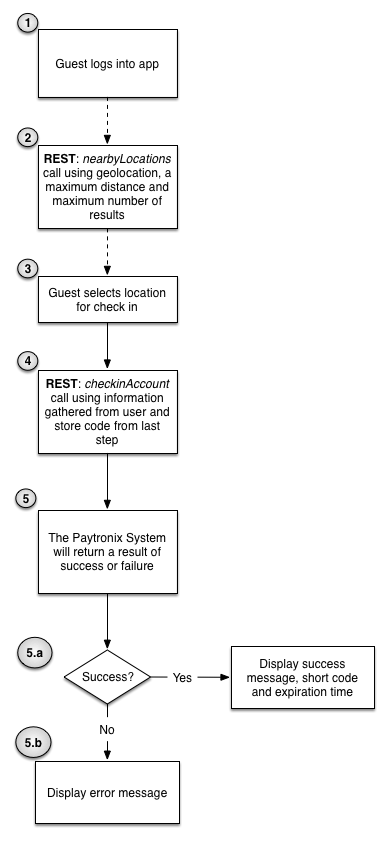
The guest logs into the site. If OAuth authentication is used, the integration obtains an access token using the steps outlined in Guest Website Login.
As an optional step, a map of nearby locations is obtained using the steps outlined in the Nearby Stores section.
The guest is prompted to select a location.
The integration sends a checkin call containing the store code from step 3.
The Paytronix system will return a result of success or failure
- If the result is a success, Paytronix will return a unique short card number and the window of time for which it is valid. Both of these pieces of information should be displayed to the guest unless otherwise specified by the merchant.
- If the result is a failure, an error should be provided to the guest. Paytronix will include additional information regarding why the message failed. This might be a critical or formatting failure, or a failure if the guest has exceeded the number of allowed checkins. This number is configurable at the request of the merchant, but there will always be a cap on how many times the guest may check in to the same store at once, as well as how many times the guest may check in to any store at once.
Example
Request Body
{
  "authentication": "oauth",
  "access_token": "rIe7dgL5pthisisnotarealtokenqrFbA268pw5GP",
  "client_id": "3FTmkQuXBnotarealcklientIDFCO9PREEnj_WHaK",
  "client_secret": "654secretnx4",
  "merchantId": 777777,
  "storeCode": "0001",
  "checkinTime": "2014-10-29 8:40:49 -0400",
  "account": {
        "printedCardNumber": "600030100123432"
  }
}
Response
{
  "result": "success",
  "expirationTime": "2014-10-30 08:54:29 -0400",
  "printedCardNumber": "600030100123432",
  "shortCardNumber": "131",
  "storeCode": "0001",
  "storeName": "Test Store"
}
API Reference
Please see the following API reference page for more technical details: Checkin Service